Sunday, January 31, 2010

PURSES AND TWILLING

Cindy teaches bag making at the Attic Window Quilt Shop. She has so many samples that she decided to get rid of a few. Stop in at the shop and take a look. You may find one or two that you want to purchase. Look for Cindy’s upcoming bag classes on the calendar on the sidebar.

Cindy’s mother Barb David teaches twilling at the Attic Window Quilt Shop. This year she is teaching how to make larger twilling blocks, many with hearts in the design. This can also be a quilt-as-you-go. Twilling Club meets the second Thursday of the month or third Thursday of the month. Don't you just love the above sample!


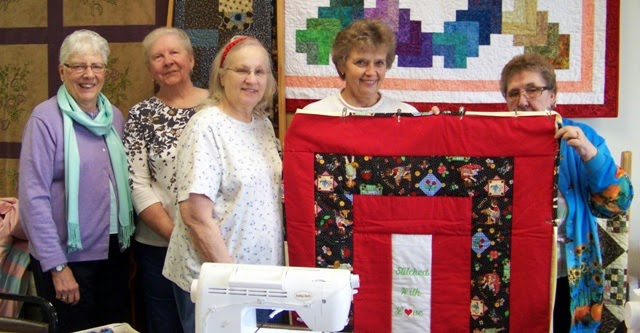
This is another sample. Barb does wonderful work and we’re hoping she will get this technique into a book soon.

When cleaning and reorganizing my sewing room I found this twilling block that I made when taking Barb’s class a couple years ago. My stitches are not as fine as hers, but twilling is a fun thing to do. I’ll soon have a wedding quilt of all twilling blocks finished. (Of course, my granddaughter was married over a year ago, but better late than never, right!)

Quilting on Turtle Hill has a great tutorial for making whirlgig blocks with two charm packs.

I love to dabble and try new techniques. I’ve never done any fabric dying before, but when I saw this tutorial I thought maybe I’d give it a try. Take a look at The Matchbook. It shows you how to make your own batik with flour paste.

Until next time,
Caroll

Thursday, January 28, 2010

ARE YOU A KNOTTY GIRL?

The Knotty Girls Stitching Bee held its monthly meeting last night at the Attic Window Quilt Shop and Priscilla shared a couple quilts with us. I love this quilt made out of homespun. It has raw edges and looks so warm and huggable.

She made this Star Wars quilt out of her son’s old Tee shirts. It is sure to be a winner with him.

This is a close up of one of the blocks. Isn’t that true of us quilters too…we must unlearn what we have learned? Deb Karasik told us a story during her recent talk at the West Michigan Quilt Guild about when she first started quilting. As a former sewer making clothes, she figured she would have no problem making curved blocks. She made her first curve quilt blocks just as she had done curves when making clothes. They were puffy much like set in sleeves are puffy. She had to unlearn all she had learned.

I love this block too. We should never look back. As quilters, we must learn from the mistakes of our past, and move forward without letting our past hold us back. Thanks Priscilla for sharing with us.
.
I am a guest blogger today at Caron Mosey’s Michigan Quilts blog. If you are interested, you can hop over and look at the quilts and the post which asks “Are You A Joyful Quilter.”
.
Geta has a wonderful tutorial for making a gift for a little girl.

Until next time,
Caroll

Tuesday, January 26, 2010

DEB KARASIK SPEAKER AT WMQG

Deb Karasik, nationally known author, teacher, and fiber artist was the guest speaker tonight at the West Michigan Quilt Guild. Paper piecing is her area of expertise, and oh my can she paper piece! The quilts she displayed tonight were so fantastic that I had to share some of them with you. You can see more of Deb’s quilts at Quilt Maven.


Deb’s quilts have inspired me to have another try paper piecing. Look for an upcoming class at the Attic Window Quilt Shop and try your hand at this beautiful art.

One Piece At a Time has a Flora Bunda BOM. I'm adding it to the side bar because it is one I don't want to forget.

Cutting instructions are up for Mrs. Moen’s Mystery block. She is also having a give away. Check the button on her sidebar to learn the details.

Until next time,
Caroll

Sunday, January 24, 2010

HOW TO USE UP THOSE SCRAPS!

How would you like to make this heart tablerunner at no cost to you? You can do that by using your scraps. Use up that batting too; just butt and zigzagged pieces together. I love “making fabric” and you will too. It’s so easy.

When I cleaned and reorganized my sewing room, I also sorted my scraps. I put the long strips in one pile and those I would cut into squares in another pile. I was left with a pile I didn’t know what to do with. I sorted them by color and put the various colors into bags. This is my pile of red scraps.
The other night I was bored, and figured I had better do something to keep my hands busy so I wouldn’t eat. I went into my sewing room, grabbed a bag of red scraps and started sewing pieces together. I would slice off a jagged edge so I could attach another piece. As the new “piece of cloth” grew, I had to decide what to do with it. Since I was using red, and Valentines Day is nearing, I thought a heart appropriate. I didn’t know how many hearts I could get out of the pile, but I just plugged away.


This is the tablerunner that I ended up with. Mary Lou Weideman says that quilters put their projects aside when they lose the mystery. Using your scraps in this manner is a mystery from beginning to end. This project is still sort of a mystery because I need to figure out what to use for the binding. I think it will make a nice gift, don’t you?
.
Speaking of things to do with scraps, check out Freda's Hive She has a nice string tutorial. I love her idea and am going to try it next. Make fabric for free!

Until next time,
Caroll

Thursday, January 21, 2010

IS THIS A CHARGER PLATE?

Do you know what a Charger Plate is? Is this a Charger Plate? WiseGeek says that a Charger Plate is “an elegant and underused element of a place setting.” It says that it is “also known as a chop plate, service plate, or under plate…. it never directly touches any food.” The Charger Plate is larger than a dinner plate and is to make the table look pretty. They can be made of a wide range of materials from metal, wood, plastic, etc. Do not eat off of your Charger Plate.

I noticed that Moda had a pattern for a Charger Plate. As WiseGeek says, a Charger Plate can be made of a wide range of materials. What, I wonder is the difference between a Charger Plate and a Placemat? We obviously are not going to eat off a Placemat. I use my Placemat for decorative purposes; among other things. (Like keeping my tablecloth clean). So is a Charger Plate just a fancy word for a Placemat? Can a Charger Plate be made out of cloth?

Did you know that there is etiquette to using a Charger Plate? According to Manners International, a Charger Plate should be on the table when the guests arrive. Makes sense to me. What doesn’t make sense is this. Manners International says that you can use your Charger Plate for the soup, fish or salad course but “It is customary for the Charger Plate to be removed prior to the serving of the entree or dinner course.” What about that entire decorative ambiance? Does anyone serve courses anymore? Manners International does say that the choice is up to the host whether to leave the Charger Plate on for the main course, however you should always remove the Charger Plate before the dessert course.

Whether you call it a Charger Plate or a Placemat you should look into Lurline’s tutorial for making a very decorative piece to go on your table. Lurline has a wonderful tutorial and she made it with beautiful fabrics. She got me inspired to do something with my scraps. It’s not as pretty as hers, but I did use up some of those scraps. Check out Loft Creations also. You will get inspired when you see how others are using their scraps to make beautiful creations.

Until next time,
Caroll

Monday, January 18, 2010

ICE TUTORIAL

I have a friend who some people call a Snow Bird. She is retired and every year as winter draws near, she leaves Michigan to spend the winter in Florida. She is back in Michigan for good now and the other day when visiting her; I noticed a red envelope on her refrigerator. The label read File of Life. She explained that all the retirees in Florida had them. The Fire Department distributed them. The envelope contained vital information, i.e., medications, emergency contacts, etc. “It came in real handy when I had my stroke,” she said. Since my 92-year-old mother lives with me, this was of interest. I had often wondered what would happen if something happened to my mother while I was out and one of the neighbors or my children were checking on her, or if something happened when I was home and became incapacitated. This seemed like just the thing to have on my refrigerator too. However, when I called our local Fire Department they said they did not have anything like that and because of budget cuts, it was unlikely in the near future. I decided to make one of my own and share it with you. Even if you do not have an elderly parent living with you, you should have this vital information readily available in an emergency.

There are two ways to make the pocket. I will show how to use your scraps first then I will show you the quick way. There is a place at the end of this tutorial where you can download the form to fill out and put in your pocket. You will need one piece of 5” x 6” fabric for the front and one for the back and a piece of batting the same size.

I just sandwiched the pieces together and stitched in straight lines, but you could meander or do whatever you like.

After that, I cut a piece of plastic 4” x 6” and stitched it to the front of the sandwich, to make a pocket. I used the heavier plastic. At this point, you could attach a binding but I did not think it necessary, and, I did not want to add weight to the pocket and make it too heavy for the magnet I had to use.

Once this is finished I cut out the letters I C E for In Case of Emergency and attached them to the top above the plastic pocket. You could use a different title if you like, perhaps something similar to what they did in Florida. However, when I talked to our local Fire Chief he thought ICE would work best because it is the same thing that he is telling people to put into their cell phones for who to contact in case of an emergency.

I then attached a magnet to the back. Depending on the type of magnet you get, you may have to make a pocket or stitch it in place. I used the kind with a sticky back and have not had any problem.

There is other way you can make your pocket. This is a much easier way but I wanted to show the scrap method in case you could not find this product. You can purchase a product called Pro Tuff. It is a heavy-duty pack cloth and feels much like plastic. Do not use your iron on it. Cut one piece 5” X 6”.

Cut a piece of clear plastic 4” X 6” and sew it to the front of your Pro Tuff plastic. Then I used a sticky back felt to cut out the ICE letters and place on the top of the back. I’m not crazy about the felt, but since I could not use an iron, I figured this would have to do. After that, I placed the magnet on the back.

Now you can download the form here , courtesy the State of Connecticut. There are two versions available. Fill it out, fold it up and place it inside your pocket. Make several and give them to your family, your neighbors, and your friends. PS: I do not recommend that you put your social security number or your Medicare card number on this form.

Until next time,
Caroll

Saturday, January 16, 2010

FREE BOM

Just a short post today, but I wanted to mention Apple Blossom Quilts Free BOM. It’s called Pushing Up Spring and is pictured above. I’m not putting it on my sidebar because this BOM is only available to those who sign up for the Apple Blossom Quilts newsletter. You can do that here. It's free. Once you sign up there will be nothing to remember because the newsletter will come to you each month with all kinds of interesting information in it as well as a link to the newest block featured.

Above shows the blocks that have been published so far. Connie Sue says that the wonderful thing is that you can still get the blocks that have been all ready been published. Remember, you can get these past patterns and the new ones when you sign up for the newsletter.

Until next time,
Caroll

Thursday, January 14, 2010

WHAT YOU CAN DO WITH SCRAPS

I have decided scraps are good. After cleaning and reorganizing my sewing room and discovering all the scraps I had, I was determined to make use of them. I made this lap quilt completely from those scraps. The sashing, binding, backing and batting was from my stash. This quilt will be given to the women at the Attic Window Quilt Shop who donate their time, money, batting and fabric to make quilts for those in a wheelchair, which they donate to the Veterans Administration. I am giving this to them for distribution. This is a very worthy cause and you do not need to come to the shop to work on one of these quilts (though it would be fun to join the group and socialize a bit). You can make these quilts in your own home. The Quilts for Wheels group will be glad to take your finished project for distribution.

What I have discovered though is that making something out of scraps generates more scraps. This is the left over backing, sashing and binding. I will just add them to my scrap box and use them when making another quilt. This has been so much fun and so rewarding that I recommend that you put your scraps to good use and make a donation project.
PS: I forgot to tell you that this was done as part of Loft Creation's No Strings Challenge. Check it out. She has some great ideas as to what to do with those scraps.

Quilt Soup has a new free pattern out. It's called Petal Path and is really cute.

In case you missed it in the Country Register, the Noble Wife has a free stitchery for you. Very cute.

Until next time,
Caroll

Sunday, January 10, 2010

NEW TEACHER AT ATTIC WINDOW

Above, Lee Ann Kluting, new teacher at the Attic Window Quilt Shop, gives instructions to her students. Some of you may have seen bags by Lee Ann on this blog over the past year. We are happy to say that we’ve finally been able to talk her into showing us how to make those lovely bags. This photo was taken at a recent class. She will be holding more classes in the future. If you are interested in a class, call the shop and get on the list.

I didn’t get a chance to interview Lee Ann because she was so intent on helping her students. You can tell by watching her instruct her class just how much she enjoys teaching and showing others how to create and make something beautiful.

Above is the sample of the bag they made that day. I’m sure I speak for others when I say, thank you Lee Ann for becoming a teacher. I hope to take one of your classes and start making my Christmas gifts early this year!
*
Do you have a problem remembering to go to those various websites to get your monthly BOM pattern? I do and last year missed out on one or two. I thought it might be helpful if I lined them all up on the sidebar so you and I could go to them with just a click or two. If you would like me to include a BOM link to a site you are following, let me know and I’ll put it on there too.
*
Have you wondered what to do with all those plastic bags you get when shopping at the various stores around town? I recycle some of them by taking back the ones I get from the grocery store. However, what about the others. Lyn Brown has a great way to recycle those bags and make something useful. Check out her fused plastic grocery sacks.

Until next time,
Caroll

Friday, January 8, 2010

DON'T MISS THIS

The above quilt is called Olivia’s Garden. Join Colleen at the Attic Window Quilt Shop and make this flower garden for your wall. You’ll be using batiks with raw edge appliqué and straight stitching. You will choose your fabrics during the first week of class. There are two sessions: Saturday, Jan. 23 and 30th.


Tessellated Churn Dash is another class you won’t want to miss. Like a jigsaw puzzle the shapes fit together to create a design and overall pattern. You can join Chris on Friday, Jan. 22 or Wednesday, Feb. 10th, to make this lovely quilt.
.
Here are some BOM's that you won't want to miss:

Until next time,
Caroll

Tuesday, January 5, 2010

MORE INSPIRATION FROM GERRY

At the Tuesday Bee at the Attic Window Quilt Shop Gerry shared a couple more quilts that were made entirely from her scrap bag. I love the black centers on the quilt above. Really ties everything together. Isn't it amazing what she does with scraps!

Gerry said that she belongs to a group that was involved in a large quilting project. She said that the above quilt was made entirely of leftovers from that project. I love how she has used this fabric. You can’t see it in the picture but she added a wide border and appliquéd squares in the corners. Very pretty.

I’ve been so inspired by Gerry that I used strips from my scrap bag today to make these squares. I’m going to sash them in the blue. It will be donated to the Quilt for Wheels group at the Attic Window. That will be a start on my New Year's Resolutions!

Angie’s Bits & Pieces has a Simple-Thymes BOM starting this week. Check it out. It’s really cute.

Until next time,
Caroll

Sunday, January 3, 2010

LET SCRAPS BE YOUR INSPIRATION

This week I would like to introduce you to Gerry Cavanaugh who is truly my inspiration. She has made seven quilts from her scrap box. Month after month, she would bring in her beautiful quilts to the Attic Window Quilt Shop First Saturday Bee and tell us how she made each one “just from scraps.”

The picture above shows Gerry’s latest creation. She said she still has 135 balls to appliqué on the border, but you can see it is going to be a beautiful quilt.

Like most of us, the New Year threw me into a cleaning/organizing frenzy. Once into that project my large pile of scraps appalled me. I had several options. I could make cute little crafty items, from jewelry to eyeglass cases to pin cushions. However, I am a quilter. I wanted to quilt. Another option is that I could just trash them. No! Absolutely not! There is something in my blood that will not let me just throw them away. They are worth something. I can make something beautiful with them. Jerry’s quilts were proof of that. I turned to Gerry for help.

Gerry said that last March she decided that she needed extra space. While cleaning and reorganizing, she decided she had to do something about her scraps. Like me, she could not just throw them out and started going through magazines and pattern books looking for designs to make with her scraps. The above nine-patch is completely made of scraps.

After spending eight hours ironing each little scrap in my scrap box, I called Gerry to ask what I should do now. I have heard of various ways to sort scraps but could not bring myself to cut all my scraps into little squares and sort by size. Sorting by color made more sense to me. Gerry said that at first she didn’t cut her scraps but did sort by size. She realized she had a pile of strips and made this beautiful strip quilt pictured above. She said that she would recommend using up your strips first. (See here for instructions for the above quilt) You can then cut your left over strips into squares for the next project. She said that when considering the next quilt she would move to the next size down, maybe using five-inch squares, and design her quilt around that. After that, she would make a quilt with 2 ½ in squares, then use up the 1 ½ inch squares. If you have triangles, put them together to make squares.

I am so imspired and hope you are too. I'm off to sew strips and hope there is a good program on TV tonight. I will keep you updated on my progress. Thanks Gerry for all your help. Your quilts are beautiful and inspiring.

Raspberry Rabbits has a free stitchery pattern. Each month there will be a new, happy and positive sentiment for you to stitch.

Until next time,
Caroll
lkjlkj

Attic Window Teachers

Attic Window Teachers

Quilting for Kids With Cancer

Quilting for Kids With Cancer
Generosity has no bounds. Above are the women in the Quilts For Kids group at the Attic Window Quilt Shop. Left to right, Henrietta, Phyllis, Nancy, Carol, Karen. These women donate their time, fabric, money once a month to make quilts for kids who have cancer.

Quilts For Wheels

Quilts For Wheels
Many thanks and much appreciation goes to the women who work diligently each month to make quilts for those in wheel chairs. Kudos go to: Yvonne, Mary T., Fran, Joan, Mary Ellen, Barb, Lee Ann, Nancy, Mary.
Quilting Bloggers Logo